> For the complete documentation index, see [llms.txt](https://docs.adaptiva.com/llms.txt). Markdown versions of documentation pages are available by appending `.md` to page URLs; this page is available as [Markdown](https://docs.adaptiva.com/patch/patching-fundamentals/flex-controls/flex-controls-blocklisting.md).
# Blocklisting
Blocklisting in OneSite Patch allows you to block potentially nefarious patches that may do more harm than good.
All patches are inspected by our metadata team and some are blocklisted. These will appear as System blocklisted patches. Additionally, you have the option to manually blocklist a patch if you encounter undesired behavior. Conversely, if there is a system blocklisted patch, you have the option to unblock as necessary.
The OneSite metadata team:
* Reviews all metadata that vendors provide for their new products and patches to verify relevance and integrity.
* Reviews content and determines whether the patch has any issues that might cause unexpected behavior.
* These may include reasons like "VirusTotal score is High" or "Cannot be uninstalled".
* Blocklists patches and products that have issues and automatically creates an exclusion for the patch on all clients.
You can view all of the blocked patches by navigating to **Advanced Settings > Flex Controls > Blocklisting > Patches** from the side navigation.
This will display a table of all curated (System) and customer blocked patches. When you select one of the patches, you can view additional information including the reason why it was blocked.

Or you can click **Blocked Patches (User)**/**Block Patches (System)** in the **Patching Overrides** widget from the **Home** dashboard.

## Add patch to blocklist
Patches are automatically added to the blocklist by OneSite's metadata team, however, you can manually add patches to the blocklist as necessary.
{% hint style="success" %}
Blocklisting is intended for potentially risky patches that will be blocked on all devices. If you're looking to restrict products and patches from installing on specific business units, please see our [Exceptions](/patch/patching-fundamentals/flex-controls/flex-controls-exceptions.md) page.
{% endhint %}
1. Select **Advanced Settings > Flex Controls > Blocklisting > Blocked Patches**.
2. Click **+ New**.
3. Add a **Name** and optional **Description**.
4. Click **Browse** and select your desired patch under the **Blocked Patch Settings** section.
5. Enter the **Blocker Name** and **Blocker email** of the admin creating the blocked patch.
6. Enter a **Block Reason**.

7. Click **Save**.
### Unblock a patch
{% hint style="warning" %}
Unblocking a patch should be performed with caution. For guidance of unblocking a specific patch, please reach out to our [Support Team](https://adaptiva.com/support).
By design, we block Windows Feature Updates so users can control if those are installed/updated on their endpoints. For more information, please see our our [Apply Windows Feature Updates](https://docs.adaptiva.com/patch/scenarios/feature-updates)
{% endhint %}
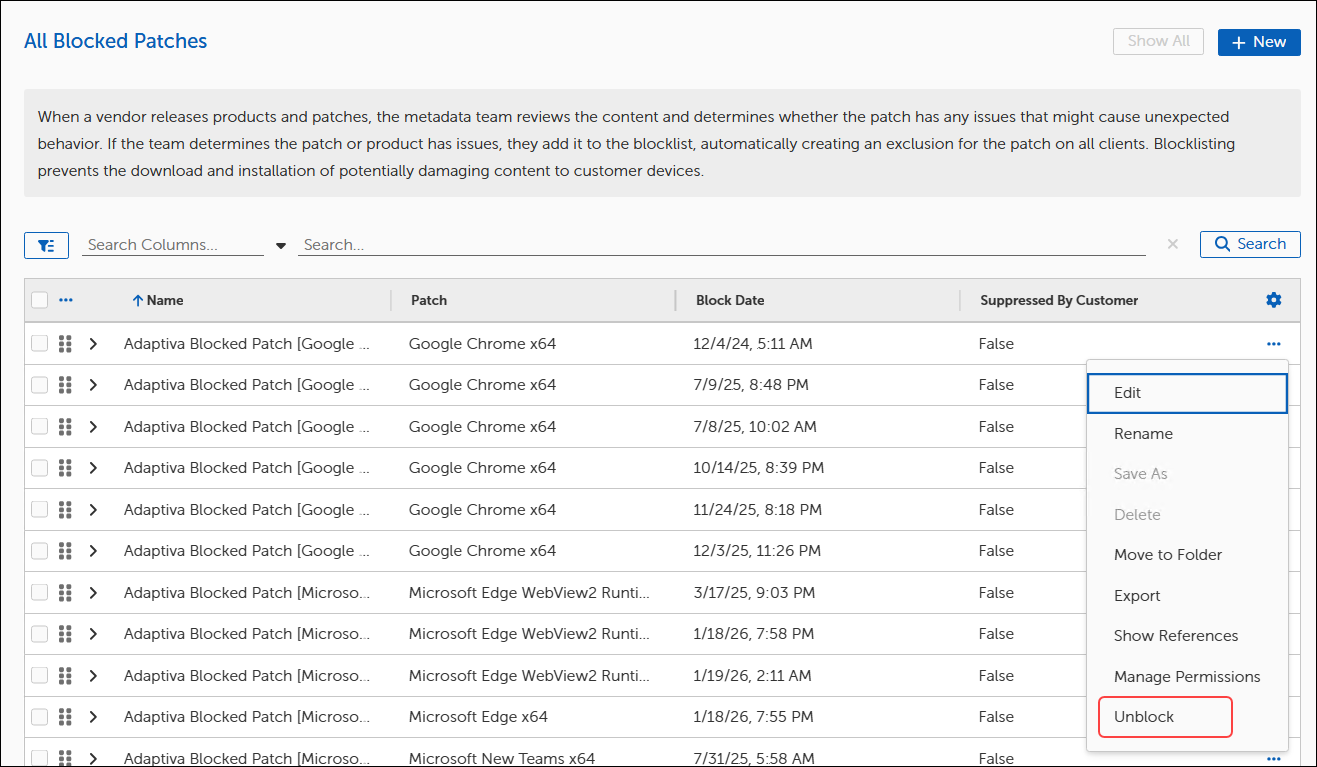
On occasion, you may notice a blocklisted patch that you need to remediate a vulnerability. In order to unblock a patch, you can click the ellipses (**...**) next to the patch you wish to unblock and select **Unblock**.
 ## Blocklist notifications
If you need a list of blocklisted patches for non-Patch users, you can create blocklist notifications.
### Create a default notification
To create a notification that will alert you about any curated or customer blocklists, follow the steps below:
1. Select **Advanced Settings > Flex Controls > Blocklisting > Blocklist Settings** from the side navigation.

2. Select **Browse** next to either **Curated Chain** or **Customer Chain** to list the available Notification Chains.
3. Select **Super Admin Notification Chain**, and then click **OK**.
4. Click **+ Browse** for either **Curated Communication Providers** or **Customer Communication Providers**.
5. In this example, select **HTMLEmailCommunicationProvider**, and then click **OK**.
6. Click **Save**. You have successfully set up a notification email containing a list of blocklisted patches to any Super Admins in your notification chain.
{% hint style="info" %}
If this is your first time setting up an email communication provider to work with OneSite Patch, you will first need to configure the [SMTP settings](https://github.com/AdaptivaDocs/docs/tree/main/platform/user-guide/smtp-settings.md).
{% endhint %}
### Create a custom notification
Perhaps you want the notifications to go to a broader list than Super Admins or Admins. You can create a custom role for this purpose.
1. Click the gear, and then select **Settings > Security > Roles** from the dropdown menus.
2. Click the root folder for **Patch Roles**, and then click **+ New**.

3. For **Role Name**, type “Notify Blocklisted Patches”.
4. For **Role Membership**, click **+ Browse** and select which employees or groups you want to be notified.
5. Click **Save**.
You will need to set up a notification chain next.
#### Create a notification chain to use the custom role
{% hint style="info" %}
For a deep dive, see [Notification Chains](https://github.com/AdaptivaDocs/docs/tree/main/patch/chains/README.md#notification-chains).
{% endhint %}
1. Select **Advanced Settings > Intent Schema > Chains > Notification Chains** from the side navigation.
2. Click **+ New**.

3. For **Name**, type “Notify Blocklisted Patches Chain”
4. For **Roles to Notify**, click **+ Browse**, and then select the role you created above: **Notify Blocklisted Patches**.
5. Click **OK**, and then click **Save**.
Finally, you'll need to deploy the chain.
#### Deploy the Custom Chain
1. Navigate back to **Advanced Settings > Flex Controls > Blocklisting > Blocklist Settings** from the side navigation.
2. For **Curated Chain**, click the **x** to remove the **Super Admin Notification Chain**.
3. Click **Browse**, and then select the **Notify Blocklisted Patches Chain** you created above.
4. Click **OK**, and then click **Save**.
The notifications will now go to the custom role you created.
## Blocklist settings
**Blocklist Settings** allows you to set up blocklist **Notifications** from desired **Communication Providers**. These notifications will alert you of any new blocklisted patches from either the curated or customer created blocklists.
1. Select **Advanced Settings > Flex Controls > Blocklisting > Blocklist Settings**.
## Blocklist notifications
If you need a list of blocklisted patches for non-Patch users, you can create blocklist notifications.
### Create a default notification
To create a notification that will alert you about any curated or customer blocklists, follow the steps below:
1. Select **Advanced Settings > Flex Controls > Blocklisting > Blocklist Settings** from the side navigation.

2. Select **Browse** next to either **Curated Chain** or **Customer Chain** to list the available Notification Chains.
3. Select **Super Admin Notification Chain**, and then click **OK**.
4. Click **+ Browse** for either **Curated Communication Providers** or **Customer Communication Providers**.
5. In this example, select **HTMLEmailCommunicationProvider**, and then click **OK**.
6. Click **Save**. You have successfully set up a notification email containing a list of blocklisted patches to any Super Admins in your notification chain.
{% hint style="info" %}
If this is your first time setting up an email communication provider to work with OneSite Patch, you will first need to configure the [SMTP settings](https://github.com/AdaptivaDocs/docs/tree/main/platform/user-guide/smtp-settings.md).
{% endhint %}
### Create a custom notification
Perhaps you want the notifications to go to a broader list than Super Admins or Admins. You can create a custom role for this purpose.
1. Click the gear, and then select **Settings > Security > Roles** from the dropdown menus.
2. Click the root folder for **Patch Roles**, and then click **+ New**.

3. For **Role Name**, type “Notify Blocklisted Patches”.
4. For **Role Membership**, click **+ Browse** and select which employees or groups you want to be notified.
5. Click **Save**.
You will need to set up a notification chain next.
#### Create a notification chain to use the custom role
{% hint style="info" %}
For a deep dive, see [Notification Chains](https://github.com/AdaptivaDocs/docs/tree/main/patch/chains/README.md#notification-chains).
{% endhint %}
1. Select **Advanced Settings > Intent Schema > Chains > Notification Chains** from the side navigation.
2. Click **+ New**.

3. For **Name**, type “Notify Blocklisted Patches Chain”
4. For **Roles to Notify**, click **+ Browse**, and then select the role you created above: **Notify Blocklisted Patches**.
5. Click **OK**, and then click **Save**.
Finally, you'll need to deploy the chain.
#### Deploy the Custom Chain
1. Navigate back to **Advanced Settings > Flex Controls > Blocklisting > Blocklist Settings** from the side navigation.
2. For **Curated Chain**, click the **x** to remove the **Super Admin Notification Chain**.
3. Click **Browse**, and then select the **Notify Blocklisted Patches Chain** you created above.
4. Click **OK**, and then click **Save**.
The notifications will now go to the custom role you created.
## Blocklist settings
**Blocklist Settings** allows you to set up blocklist **Notifications** from desired **Communication Providers**. These notifications will alert you of any new blocklisted patches from either the curated or customer created blocklists.
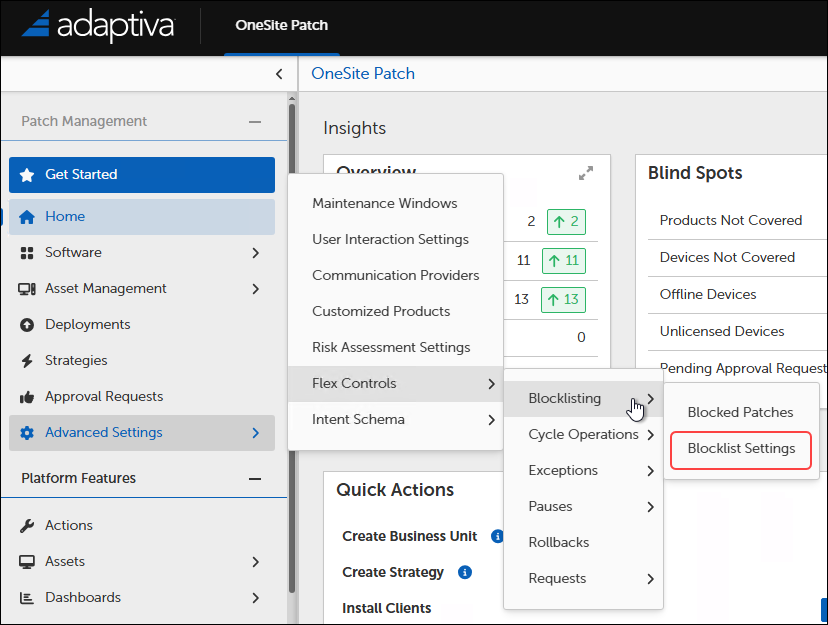
1. Select **Advanced Settings > Flex Controls > Blocklisting > Blocklist Settings**.
 * Notification Chain
1. Select **Browse** next to either **Curated Chain** or **Customer Chain** to list the available Notification Chains. If you need to create a new Notification Chain for these purposes, see [Create a Notification Chain](/patch/advanced-settings/chains.md#notification-chains).
2. Select the desired notification chain from the list.
3. Select **OK**.
* Communication Providers
1. Select **+ Add Communication Providers** for either **Curated Communication Providers** or **Customer Communication Providers** from the **Blocklist Settings**.
2. Select one or more communication providers from the table.
* If you need to add providers to the table, see [Create a New Communication Provider](/patch/advanced-settings/communication-providers.md).
3. Select **OK**.

Depending on which communication provider you choose, your selected roles will receive a notification within a few minutes of the change. Below is an example of the notification email with the settings above:

* Notification Chain
1. Select **Browse** next to either **Curated Chain** or **Customer Chain** to list the available Notification Chains. If you need to create a new Notification Chain for these purposes, see [Create a Notification Chain](/patch/advanced-settings/chains.md#notification-chains).
2. Select the desired notification chain from the list.
3. Select **OK**.
* Communication Providers
1. Select **+ Add Communication Providers** for either **Curated Communication Providers** or **Customer Communication Providers** from the **Blocklist Settings**.
2. Select one or more communication providers from the table.
* If you need to add providers to the table, see [Create a New Communication Provider](/patch/advanced-settings/communication-providers.md).
3. Select **OK**.

Depending on which communication provider you choose, your selected roles will receive a notification within a few minutes of the change. Below is an example of the notification email with the settings above:
